Once cut, a little work to re-straighten the sheet as the cutting with the snips produced a slight curve and the piece was laid out to make sure the sizing was correct.
After that, I used a sharpie to trace out the 0.5" flaps for the bend.
Next, the piece is deburred and smoothed. Then, using a step drill I drilled out the slot for the 0.5" rudder tube. The slot was cleaned with snips and then smoothed and deburred.
After that, I used a 1" hole saw in the drill press to create the slot for the spar.
Once done, the rough hole (below) was turned into a slot with tin snips and smoothed and deburred.
The piece was then trial fit with the rudder before bending the 0.5" side tabs. At this point, the protective plastic is still on the sheet and will be taken off once the bends are complete.
Off to the trusty Harbor Freight sheet metal brake. The first tab was bent up about 90 degrees. The second side was bent in the same direction, but because of the first bend I couldn't get fully to 90 degrees. A few taps with the rubber mallet along the length of the stiffener brought it to the final 90 degree angle.
Once bent, the piece is trial fit and it sits snuggly in place. After that, the plastic was removed and piece was run through the sander to smooth and debur all the edges. The tabs along the rudder edge was trimmed with the sander to match the curve of the rudder and make a smooth connection.
Next, the rivet holes were drilled, deburred, and held in place with clecos.
The rudder was flipped over on the edge of the workbench, clecos in place, and the rivet holes on the opposite side were drilled, then cleaned and deburred.
Once riveted in place, the strengthener looks good! A few taps with the rubber mallet on the tabs makes them flush.
Time to do it all over again on the bottom strengthener! Following the same process, it took about one third the time the first one did.
Now, the structure of the rudder is finally complete.
The next step was the final gussets for the top and the middle of the spar. Using the sheet and snips again, the gussets were cut out, trimmed, and smoothed.
Next, due to the angular difference between the 0.5" rudder tube and the 1" spar, I used the metal brake to bend two bends at about 15 degrees in the gusset plates so they would sit flush when riveted.
This idea was not in the plans, but rather courtesy of my dad, an A&P. From the look and feel of it, the gussets are just as strong and the rivets are nice and flush. Holes for the rivets are drilled out and deburrednext.
Then, the gusset is riveted in place.
The rivets look good. After this side was finished, the process was repeated on the opposite side.
I like the additional bends in the gussets, they look quite strong, despite the "slot" connection with the rudder tube that will be changed to a better design in the final rudder.
Next, on to the gussets for the middle tube.
I used the same process here, including the bends to allow for the size difference in the spar and the tube.
One side is riveted in, then flipped over for the other side.
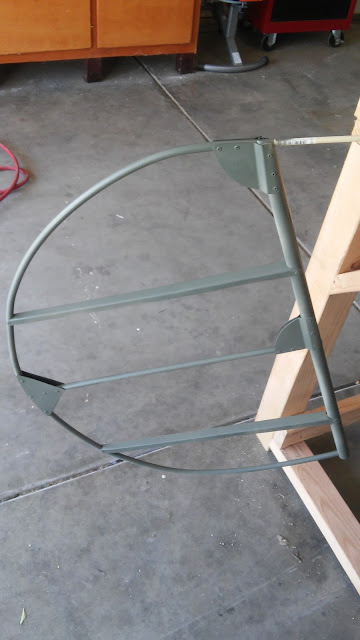
Here is the final rudder before cleaning and priming.
And here it is!
Finally, the rudder is cleaned with M.E.K. thoroughly to remove and any gunk, sharpie marks, or any other debris accumulated through the process of constructing the rudder. Lastly, a coat of self-etching primer and the practice rudder is finally done.
What do you think?
Planning Time = 2.5 hours


Looking good. I saw your post on the builder's yahoo group and had to come by to see the results.
ReplyDeleteThanks!
Delete